Wednesday, April 20, 2011

Mixing it up

last class we attempted a chaotic catch up with everyone on Cyanotype and Van Dyke as well as combining the two processes, with various levels of success. It is tricky to get something interesting, but when it works, it's very cool.

What we did was make a very over exposed cyanotype. Once this had dried we coated the print with a 50% dilution of reccomended van dyke. and then make an exposure over that. This is not an easy thing to master, but over time, one can get amazing results!


Simon #1 sent along the information for the Fox Talbot work which can be found:
"... in the library's special collections section:

http://special.st-andrews.ac.uk/saspecial/index.php

If you want to see them you probably can without a problem, if they
recognise your Edinburgh library card -- which they probably do, but
it'd be best to check before coming up."


This weekend is International Pinhole Day. I hope you can find a time to celebrate it. 
http://www.pinholeday.org/events/?event=2194


We won't have class this week in observance of various holidays. Next week we will be doing Albumen. 
This is a very particular process. Please look at the link in the previous posting, to make yourself decent negatves for the process, or you might be disappointed. I want everyone to have 5 good negatives for the process, ready to work with next class, as well as 10 pieces of paper torn down to size and labeled with your name and process on it. THIS MUST BE DONE BEFORE CLASS. 


If you would like to do Anthrotypes, please bring in some of the following: 
beets, berries, flower petals, leaves, herbs etc
please bring enough to share. we will only be making the emulsions in class bring some bottles to take your emulsions home to coat. 
http://www.nickyjthompson.co.uk/gallery_302244.html
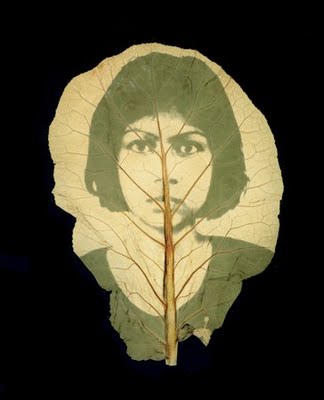
Bin Dahn, Chlorophyll process

Tuesday, April 12, 2011

Van Dyke Brown

http://www.flickr.com/photos/blue_dolphin
part A:
Ferric Ammonium Citrate: 9.0 gm
Distilled Water: 33.0 ml


part B:
Tartaric Acid: 1.5 gm
Distilled Water: 33.0 ml

part C:
Silver Nitrate: 3.8 gm
Distilled Water: 33.0 ml


Parts A and B are  mixed together and then C is added slowly while being stirred. This solution, kept in a light tight bottle such as an amber bottle or a white platic container will keep, like cyannotype, for up to a year.

The Van Dyke solution can be applied in the same manners as the cyannotype, different brushes will create different effects, we can also make a mask to keep very clean, controlled edges if that is the look we're going for. We use x drops of solution per A5 piece of paper and y amount of drops for A4...

Van Dykes are a "faster" process than cyanotype. Faster refers to the speed in which the light sensitive material reacts to light. The exposures for cyanotype were anywhere from 15- 40 min long and we could coat our paper in incandescent light. With van dykes we need to keep them in very low, safe light to prevent the material from "fogging" - reacting to light and getting darker. Our exposure times for Van Dyke were much faster, ranging from 3-9 min.

It is another printing out process in UV light (sunlight). Printing out means, while we are making the exposure we can see the image begin to appear. Once we've seen our image appear the darks will look like a burnt sienna colour (dark orange/brown) and our image will be about half as dark as we want it to be in the final image.

Take the exposed print to the darkroom, and "develop" the print in water for 3-5 min. This should clear away the left over unexposed chemicals. The next bath is 4tbs of sodium thiosulfate (hypo)crystals per liter of water.  This is the fixing bath which will darken and fix the image. The print should remain in the fixer for 5 min. The final stage is a last bath of contantly refreshing water to wash the prints clear of all chemicals. This wash should last for 30 min. The final print will "dry down"- darken once it has dried.
http://www.flickr.com/photos/whitney_h
************************************************************************
Assignment

i had everyone coat extra sheets of paper so you can take them home and make exposures during the week. I'd like everyone to bring in at least 2 cyanotypes and 2 vandykes they made for next week that they are very pleased with. Please try to make an exposure in your pinhole cameras!

Class is going to start at 12pm next week, as we have a lot to do and need to catch people up.

I want everyone to come in with their negatives anywhere from 120- to A4 in size. I would like everyone to have their paper already torn down to size and have their names written on each piece so we don't have to waste time getting that done. Consider printing on other types of paper, fabrics or other surfaces. Catalina made some collages from different images she found in a magazine which looked really interesting. For those of you who are printing negatives think about contrast, you will want to make very contrasty negatives to print... please take a look here for more technical information on making negatives. Picnick is a great free online photo editor- if you want to add effects or edit your images. It is very comprehensive. You only need to upload your images. http://www.picnik.com/

if you can't come to class, please let me know as soon as possible so i don't hold up the class waiting for you to show up.

Tuesday, April 5, 2011

DIY negatives and Cyannotypes!

an easy method of image production on light sensitive materials is to simply lay an object on the paper and expose. This is called a photogram.

Essentially a contact print is the same thing, only much more detailed. A contact print is what we're making when we lay an image (whether positive or negative) directly on the paper, as opposed to making a projection.

Paper negatives are made by oiling or waxing the paper the image is printed on in order to make it much more translucent.  Images can also be made using the paper negatives we created in our pinhole cameras last week. I hope some of you will try to do this.

Maddi said this about her paper negative process :
Maddi Barber's negative

"The first one was a black and withe one, and it had a lot of contrast, so I only opened on photoshop and inverted it.The others were in colour, so I took out the colour and brought more contrast getting more withe and black difference...and invert them.
and that's all!"                                      
Cliche Verre, Unknown Artist
There were a good number of images printed on transparency. With some really great results. There are ways to adjust the "curves" in photoshop to get your image to print exactly how you want. If you are interested in getting more information on making digital negatives let me know, i can try and put you in the right direction.

Another process we didn't get to try but is very cool is the Cliche Verre. This is essentially painting or drawing on a transparent surface... traditional methods include tallow candle smoke, or asphaltum as a resist which was then etched into on the glass to produce interesting images. Sharpies, sumi ink, iron filings could all be very interesting things to experiment with.

*******************************************
Cyanotype!

this is a very simple process consisting of 2 parts:
part A, ferric ammonium citrate + H2O
part B, potassium ferric cyanide + H2O

after these are mixed, we combine 1:1 of A & B
a piece of A5 paper would use 6 drops A to 6 drops B

the paper is coated with a hake or sponge brush (which has been whetted to prevent wicking of chemistry into the brush) and allowed to dry for about an hour.

afterwards we place our image/object on the paper and expose it to UV light
sunny days will produce more contrasty images while cloudy days might increase tonality

we look for our darkest areas to change from that pale yellow-green to a dark blue-green and then lighted up. We can lift up our image to see the paper "printing out" as it is exposed to light.

it is recommended, as with every process , to make tests.  Everyone coats paper differently, and each negative will yield a different result. Make sure you mark down your technical notes
how many drops of chemistry
date and time of day
weather conditions
time of exposure
all these will help you in the future to make better prints.

develop in water (you may add a splash of vinegar to increase mid tones)
keep in water until highlights no longer appear to be yellow.

for instant gratification, put in waterbath with hydrogen peroxide.
we experemented with some different toners, wine, tea, dektol and laundery detergent.

when finished, wash print for 20 min and lay to dry.
*******************************************
assignment for next week:

bring along all previously made work, negatives etc.
Please make some new negatives as well- go crazy, make some weird and strange things!!!
i want everyone to tear or cut their paper to size for the images they plan to print on. I would like everyone to have enough to use in class, as well as bring some home to make exposures with to bring in for the next week. 
Please write your name and the process on the back before class. 

i would like everyone to email me before next week with a theme for the class book and what process you want to use for your page. As there are 11 of us in the class we will each need to make 12 of the same pages, some processes will be used 2x. I would like to have an extra copy available for Forest to keep...  the dimensions of the page will be 8"x 4" folded in half. If i don't get an email, i'll assign one to you, don't worry it will be fun and i'll help you outside of class to make the pages if needed. 
portal book, cyanotype: Brittonie Fletcher
*******************************************
go to the Ingleby gallery, Anna Atkins (one of the first female photographers) did botany photograms on cyanotype- her work, some of it is there! They also have a wonderful book collection in their basement.